Microsoft Outlook Integration: Configure a Room Inbound Sync
Overview
A Room Inbound sync imports room bookings from Microsoft 365 into TimeEdit.
Only confirmed Outlook events are synchronised.
This guide explains how to edit an existing Room Inbound sync setting.
Before You Begin
Before editing a Room Inbound sync, ensure that:
- The Microsoft Outlook integration has already been configured.
- A Room Inbound sync setting already exists.
- The required reservation template and field mappings have already been configured by your TimeEdit implementation team.
Open Sync Settings
- Go to Admin.
- Select App Settings → Integration.
- Select Microsoft 365.
- Open Sync settings.
- Open the Room Inbound sync setting you want to edit.
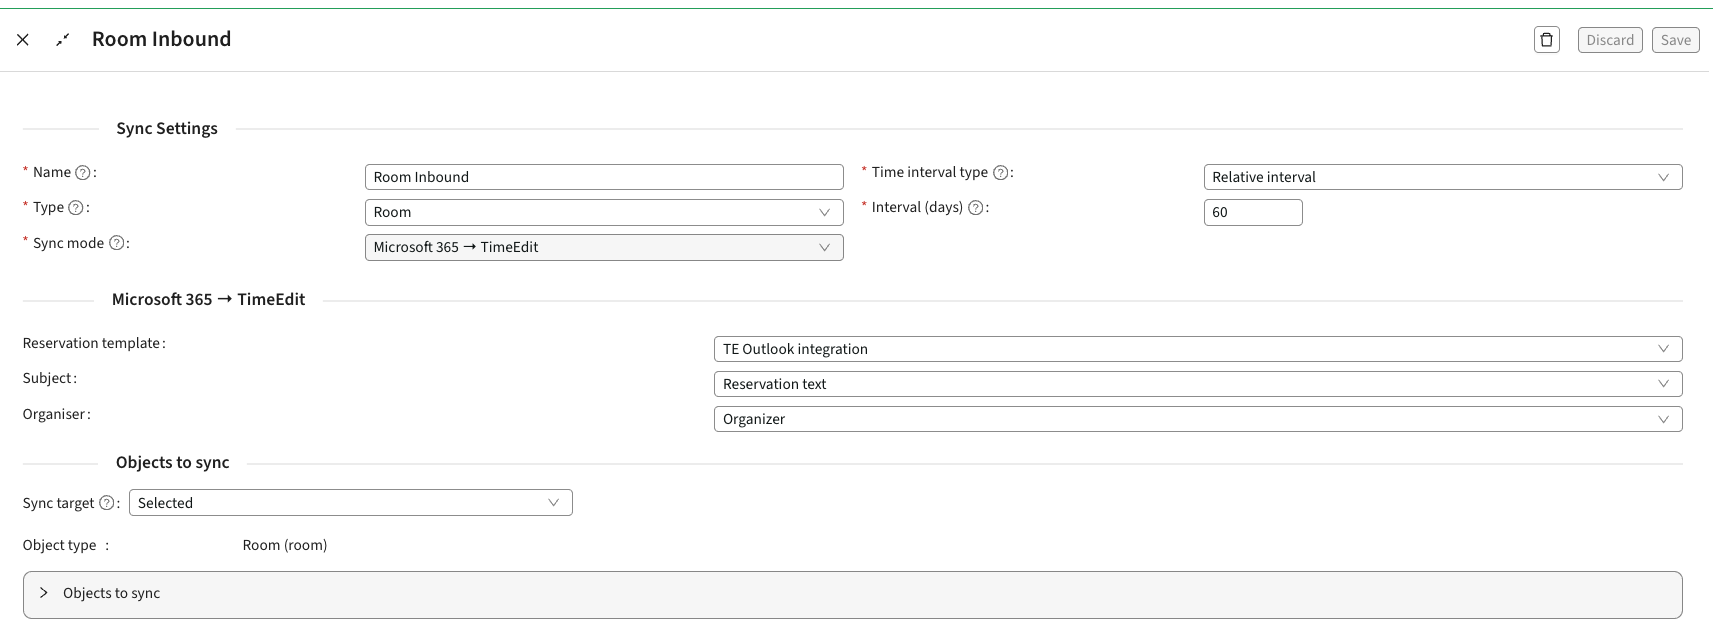
Configure the Synchronisation Interval
The synchronisation interval determines which Outlook events are imported into TimeEdit.
For best results, use the same interval as the corresponding Room Outbound sync.
Configure Mappings for Subject and Organizer
This configuration is made by your TimeEdit Application consultant.
The inbound configuration determines how Outlook event information is stored in TimeEdit.
Typical mappings include:

Your organisation may use different field names depending on local configuration.
Select Rooms to Synchronise
Choose which rooms should be included in the synchronisation.
Available options:
- All - includes all objects within the set Object Type
- Filtered - allows you to use Category Fields for filtering on objects (ie. Campus X)
- Selected - you click ‘Add’ to choose the objects to include in the synchronisation
For best results, use the same rooms as for the corresponding Room Outbound sync.
Save Changes
Click Save to apply the updated configuration.
Result
Confirmed Outlook room bookings that match the configured criteria will automatically be imported into TimeEdit. Already existing reservations will be synced in the nightly run.