Microsoft Outlook Integration: Configure a Room Outbound Sync
Overview
A Room Outbound sync automatically publishes reservations from TimeEdit to Microsoft 365 room calendars.
This guide explains how to edit an existing Room Outbound sync setting.
Before You Begin
Before editing a Room Outbound sync, ensure that:
- The Microsoft Outlook integration has already been configured.
- Room objects have valid e-mail addresses configured in TimeEdit.
- A Room Outbound sync setting already exists.
Open Sync Settings
- Go to Admin.
- Select Integration -> App Settings.
- Select Microsoft 365.
- Open Sync settings.
- Open the Room Outbound sync setting you want to edit.
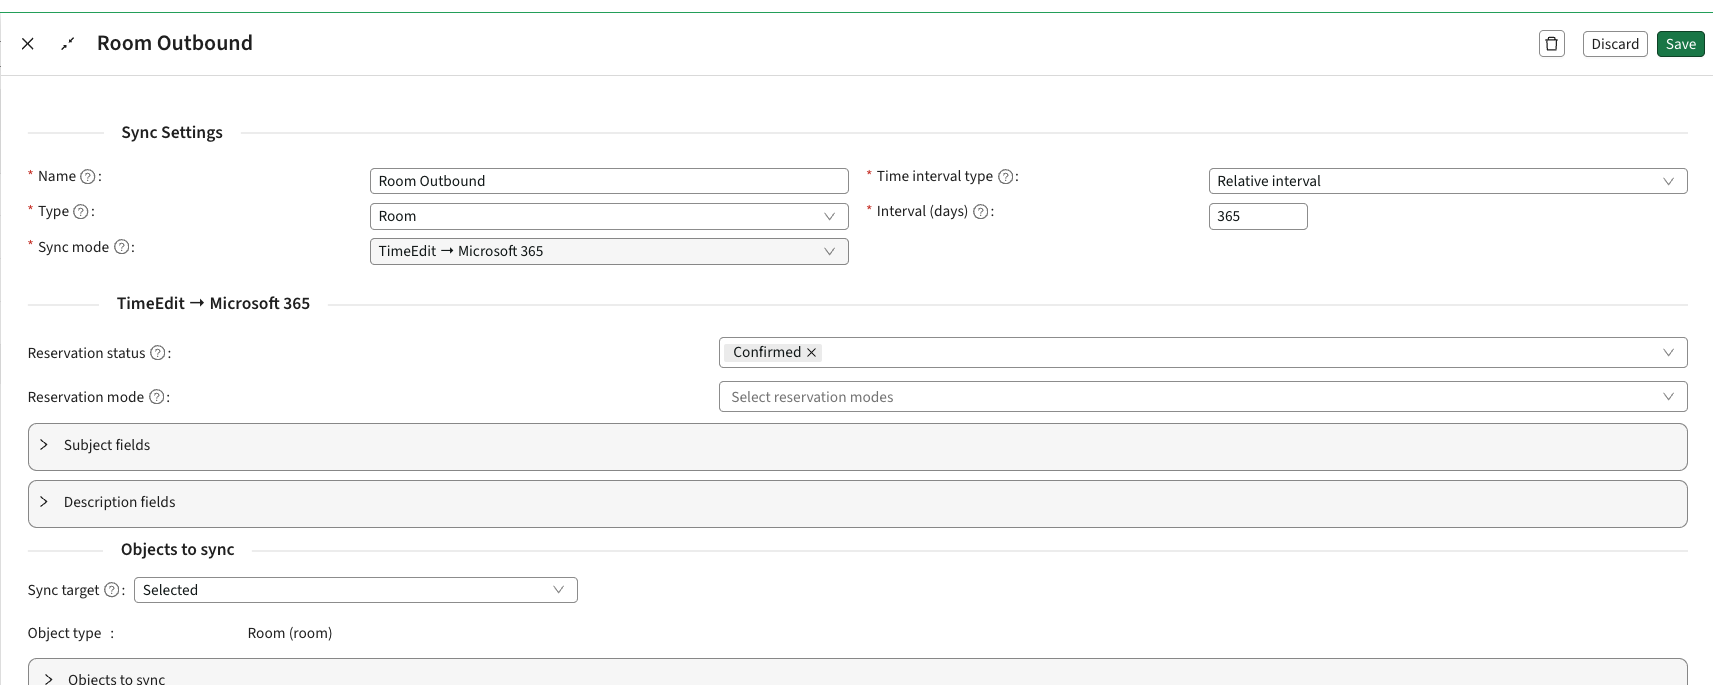
Configure the Synchronisation Interval
The synchronisation interval determines which reservations are sent to Microsoft 365.
You can configure either:
- A relative interval
- An absolute date range
Example:
- 365 days forward
- Specific start and end dates
Configure the Outlook Subject
The Subject field determines how the event title appears in Outlook.
The subject can be built using your optional combination of :
- Object fields
- Reservation fields
- Free text
The Subject field determines how the event title appears in Outlook.
Example:
Course name + Activity type + Comment
Subject Alternatives
You can configure multiple subject alternatives.

The integration evaluates the alternatives from top to bottom and uses the first complete alternative where all configured fields contain values on the given reservation.
Example:
Priority l Subject configuration
1 l Module/Course Name + Student Group Name
2 l Module/Course
3 l Reservation Text
4 l No title
In this example:
- If both Module/Course Name and Student Group Name exist, the first alternative is used.
- If Student Group Name is missing, the integration uses the second alternative.
- If Module/Course Name is also missing, the integration uses Reservation Text.
- If none of the configured alternatives contain valid values, Outlook will receive (No subject) unless a free-text fallback has been configured as in this example ‘No title’.
Recommended Practice
Configure several alternatives to ensure that all synchronised type of reservations receive meaningful event titles.
Configure the Outlook Description
The Description field controls the information shown in the Outlook event body.
Description fields are configured as individual rows.
Supported Field Types
You can include information from:
- Object fields
- Reservation fields
- Reservation information
- Free text
For each row, you define:
- A Label
- Type of field
- Either
- An Object + Field
- A Field
- Your own choice of Free Text
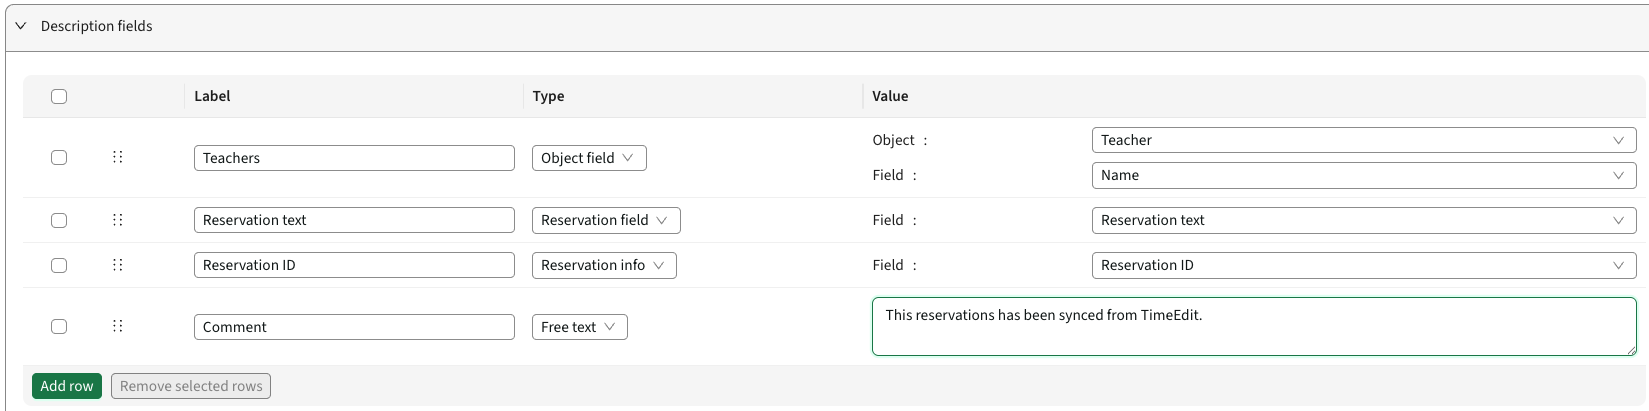
Using Labels
The Label is displayed together with the selected value in the Outlook event description.
Example:
Label l Value
Teachers: John Smith
Reservation text: Weekly project meeting
Reservation ID: 123456
The generated Outlook description may appear as:
Teachers: John Smith
Reservation text: Weekly project meeting
Reservation ID: 123456
Empty Values
Description rows are only included when the selected value exists on the reservation.
For example:
Label: Teachers
Value:
Teacher.Name
If the reservation does not contain a Teacher object, the row is omitted entirely and no output is generated.
This helps keep event descriptions clean and prevents empty labels from being displayed.
Recommended Practice
Include information that helps users identify and troubleshoot reservations.
Common examples include:
- Teachers
- Student groups
- Reservation text
- Reservation ID
Including the Reservation ID is particularly useful when investigating synchronisation issues.
Select Rooms to Synchronise
Choose which rooms should be included in the synchronisation.
Available options:
- All - includes all objects within the set Object Type
- Filtered - allows you to use Category Fields for filtering on objects (ie. Campus X)
- Selected - you click ‘Add’ to choose the objects to include in the synchronisation
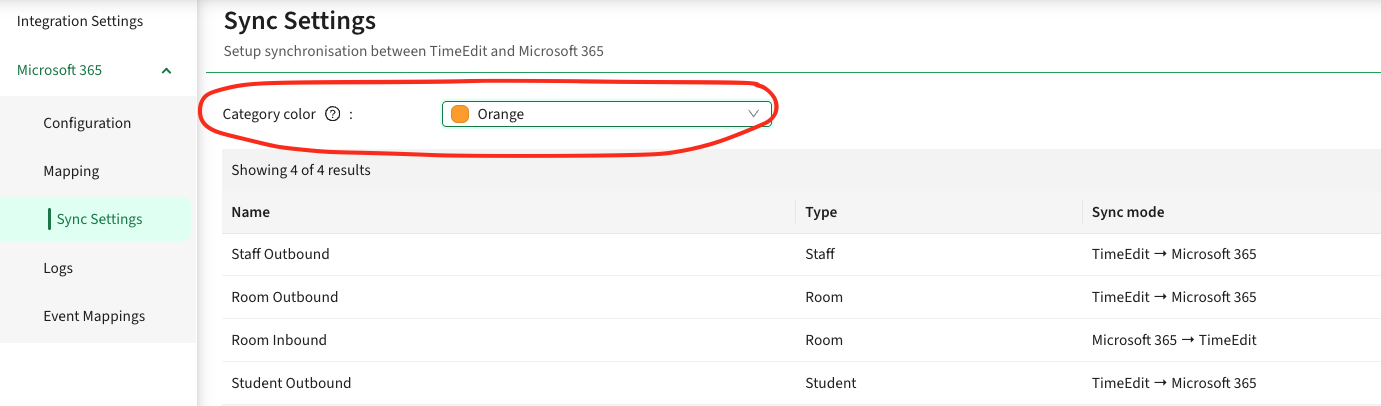
Configure Event Color
If required, configure a color for synchronised reservations.
The selected color will be applied to reservations created through this sync setting.
This is made in the general tab ‘Sync settings’ and applies for all below Sync Settings.
Save Changes
Click Save to apply the updated configuration.
Result
New and updated reservations that match the configured criteria will automatically be synchronised from TimeEdit to Microsoft 365 room calendars. Already existing reservations will be synced in the nightly run.